

Let’s Talk About That Hole in Your Roof (The Good Kind)
You know that one room in your house? The one that feels a little bit like a cave, even at noon? You’ve tried the brightest LED bulbs, painted the walls a “breathable linen,” and even thought about knocking down a wall just to catch a sliver of the afternoon sun. I’ve been there. It’s frustrating when your favorite chair is in the darkest corner of the house.
This is usually the moment when homeowners start looking up at the ceiling and thinking, “What if we just… let the light in from above?”
Adding a skylight is a big decision. It’s literally cutting a hole in your home’s most important defense—the roof. Before you jump in, we need to talk about the skylight pros and cons. Honestly, I love them, but they aren’t a “one-size-fits-all” solution. We’re going to walk through how to decide if one is right for you, the steps to get it done, and the “oh no” moments you want to avoid.
If you’re just starting to dream about expert roofing services in Texas, consider this your coffee-table chat about the light at the top of the tunnel.
Prerequisites: What You Need to Know Before You Cut
Before we get into the “how-to,” you need to check a few boxes. You don’t want to get halfway through a project only to realize your roof structure can’t handle it.
- Roof Type and Pitch: Most skylights are designed for pitched roofs, though flat-roof versions exist. The pitch affects how the light enters and how water drains off.
- Structure Knowledge: Are your roof rafters “stick-framed” or are they manufactured trusses? Trusses are tricky—you can’t just cut through them without an engineer involved.
- The Climate Reality: Look, we live in a place where the sun is aggressive. In Texas, a skylight isn’t just letting in light; it’s letting in heat. You’ll want to look at “Low-E” glass or tinted options.
- The Right Team: This isn’t a weekend DIY job for most people. You need a crew experienced in skylight repair and installation to ensure it’s actually watertight.
Step-by-Step: Evaluating and Installing Your Skylight
1. Identify the “Why” and the “Where”
First, figure out what you’re trying to achieve. Is it just about light, or do you want the skylight to open for ventilation? Placing a skylight on a north-facing roof provides steady, cool light. A south-facing one? That’s going to be a heat magnet.
Pro Tip: Think about the path of the sun throughout the year. A skylight that looks great in December might turn your living room into a sauna in July.
2. Weigh the Skylight Pros and Cons
This is the “gut check” phase. Here is the honest breakdown:
The Pros:
- Incredible Natural Light: It’s better than any lamp. It makes rooms feel massive.
- Privacy: You get the view of the clouds without the neighbors looking in.
- Health: Extra Vitamin D and a reset for your circadian rhythm. It actually helps you sleep better.
- Resale Value: A well-placed skylight is a “wow” factor for buyers.
The Cons:
- Heat Gain: In the summer, your AC might work a little harder.
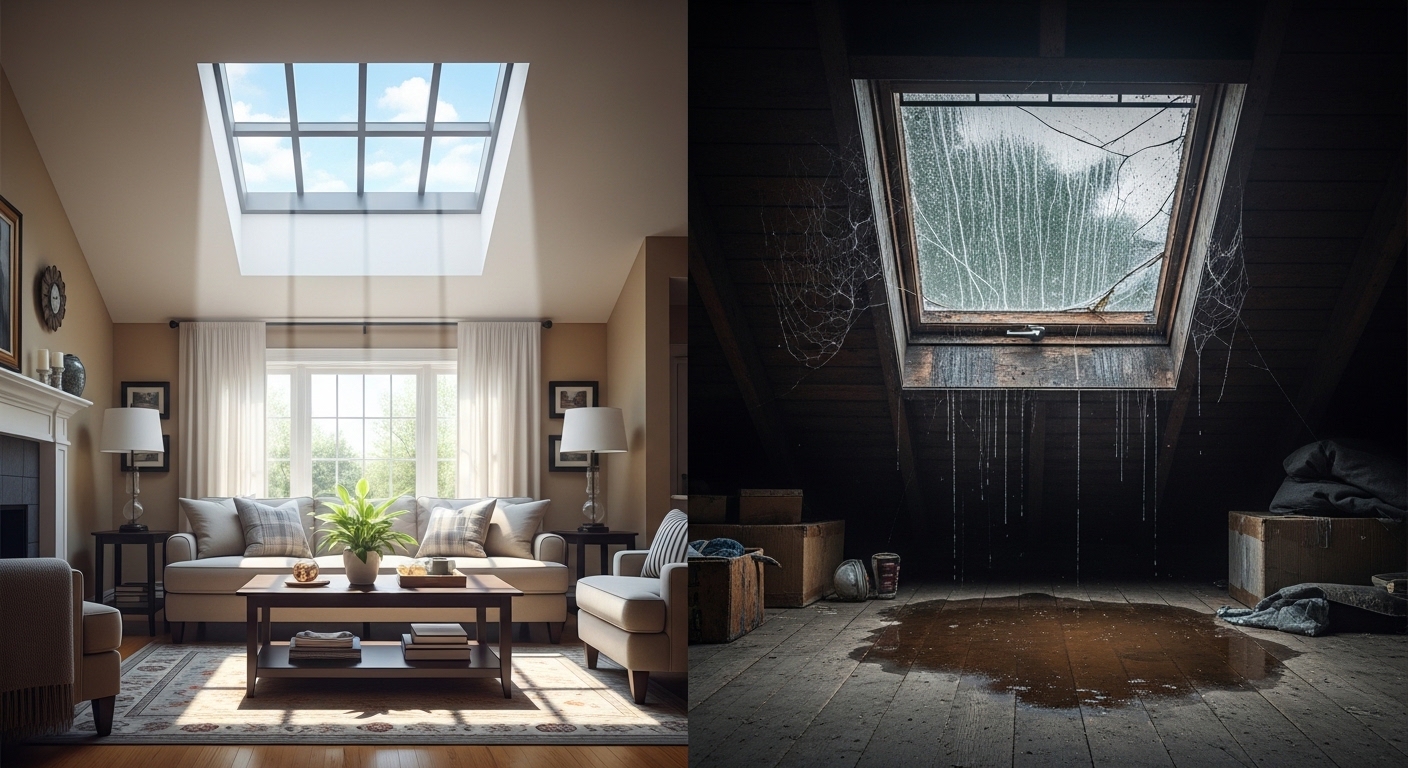
- Potential for Leaks: If installed poorly, it will leak. It’s just physics.
- Maintenance: You can’t just Windex it easily. You’re going to need a long pole or a ladder.
- Light Control: Sometimes you want it dark (like for a nap), and unless you get shades, that light is coming in whether you like it or not.
3. Choose Your Weapon (The Type)
You’ve got three main choices:
- Fixed: It doesn’t move. Just light.
- Venting: It opens manually or via remote. Great for kitchens or bathrooms to let out steam.
- Tubular: A small “sun tunnel” for tiny spaces like closets or hallways.
4. The Installation (The Scary Part)
This involves cutting the roof deck, framing the opening, installing the skylight “curb,” and—most importantly—flashing it. Flashing is the metal shielding that keeps the water out. If your contractor skimps here, you’re going to have a bad time.
Expected Outcome: Once the new roof installation or retrofit is done, the room should instantly feel “lifted.” The shadows should be softer, and the colors in your room will finally look like they did on the paint swatch.
Seeing is Believing: Visualizing the Impact
The first image should show the difference in airflow for a venting unit. The second is crucial—it shows you the “sandwich” of materials that keep your attic dry. When you talk to a contractor, ask them to explain how they handle the “flashing” shown in this diagram.
Troubleshooting: When Things Go South
Even with a perfect installation, things can happen. Here’s what to look out for:
- Condensation: If you see fog inside the glass, the seal might be blown. This usually means the unit needs replacing, not just a repair.
- Drafts: If the room feels cold, the “chase” (the tunnel from the ceiling to the roof) might not be insulated properly.
- Water Spots: If you see tea-colored stains on the drywall around the skylight, call someone for storm damage repair immediately. Don’t wait for the next rain.
Expert Tips for Better Results
- Go Big or Go Home: Small skylights can sometimes look like a “mistake” or a fluorescent light fixture. If your space allows, a larger unit (or two side-by-side) looks much more intentional.
- Get the Remote: If you’re getting a venting skylight, get the solar-powered remote version. You think you’ll climb a ladder to open it? You won’t. I promise.
- Check the Sensors: Some modern skylights have rain sensors that automatically close the window at the first drop of rain. In Texas, where we get those “blink and you missed it” afternoon showers, this feature is a lifesaver.
- Coordinate with Roofing: If your roof is more than 10 years old, wait until you’re doing a roof replacement to add the skylight. It saves you money and ensures the seals are integrated with the new shingles perfectly.
Summary: Is the Sun Calling Your Name?
Adding a skylight can truly change how you feel about your home. It turns a “cave” into a sanctuary. But, as we’ve seen in our skylight pros and cons list, it requires a bit of strategy and a lot of respect for the Texas heat.
Here’s my take: If you have a room that feels dead during the day, a skylight is the best “renovation” you can do for the money. Just don’t cut corners on the installation. Use a team that knows the local weather patterns and understands how to keep a roof watertight.
Next Steps:
- Walk Your House: Identify the one room that needs light the most.
- Check the Attic: See if there are any major pipes or wires in the way of where you want the light to go.
- Talk to a Pro: Get an honest assessment of your roof’s health.
Ready to see your home in a whole new light? We’ve helped plenty of folks find that perfect balance of sunshine and protection.
Request a free estimate from Tekton Exteriors and let’s see if a skylight is the missing piece of your home’s puzzle.
Would you like me to look up the current energy tax credits for solar-powered skylights to see if you can save some money on the installation?